

Théo Putegnat
Software Engineer

Taylor Overturf
Technical Content Writer
Modern threats increasingly unfold at runtime, where attackers exploit live workloads, spawn malicious processes, and move laterally across your environment. Detecting that activity is essential, but a signal only matters if you can stop it. When a threat appears, every step before a response gives an attacker more time to act.
Datadog Workload Protection can now directly remediate threats with both automated and manual response. When the Datadog Agent finds malicious activity, it can automatically kill or isolate the offending process based on your Agent rules. Alternatively, when a threat needs a closer look, you can step in and respond yourself. This post covers how Workload Protection helps you:
Cut time to remediate (TTR) with response actions
Time to remediate (TTR) spans detection, investigation, decision, and intervention. Each step adds latency that widens an attacker’s window. Attackers now exploit vulnerabilities almost as soon as they’re disclosed, and that gap keeps shrinking. Workload Protection gives you two ways to stop a threat. You can automate the response with an Agent rule, or respond yourself when a signal is raised.
Automated response to close the attacker’s window
Turn on automated response for an Agent rule, and the Agent acts the moment it finds a match, reducing the manual steps between detection and intervention. Use Datadog’s default out-of-the-box (OOTB) rules or write your own custom rules. Automated response terminates matching processes, so it’s best suited to activity that is unambiguous and never legitimate.
For example, take a crypto mining threat. When automated response is active for an Agent rule, the Agent can terminate matching processes in the services where it’s safe to do so while continuing to monitor everywhere else. The attacker’s window closes when the Agent finds a match rather than when a person is able to act. The Agent also records each automated kill in a signal you can review afterward.
Manual response to investigate and act in one place
You don’t have to automate every rule. When a rule you haven’t automated raises a signal, you can investigate and then choose a manual response. Responding manually has traditionally meant extra friction. Security teams often have to leave their investigation workflow to contain a threat. This slows response, invites errors, and compounds into operational fatigue, a known risk factor for security breaches. Now you can respond to a threat in the same place you detect it.
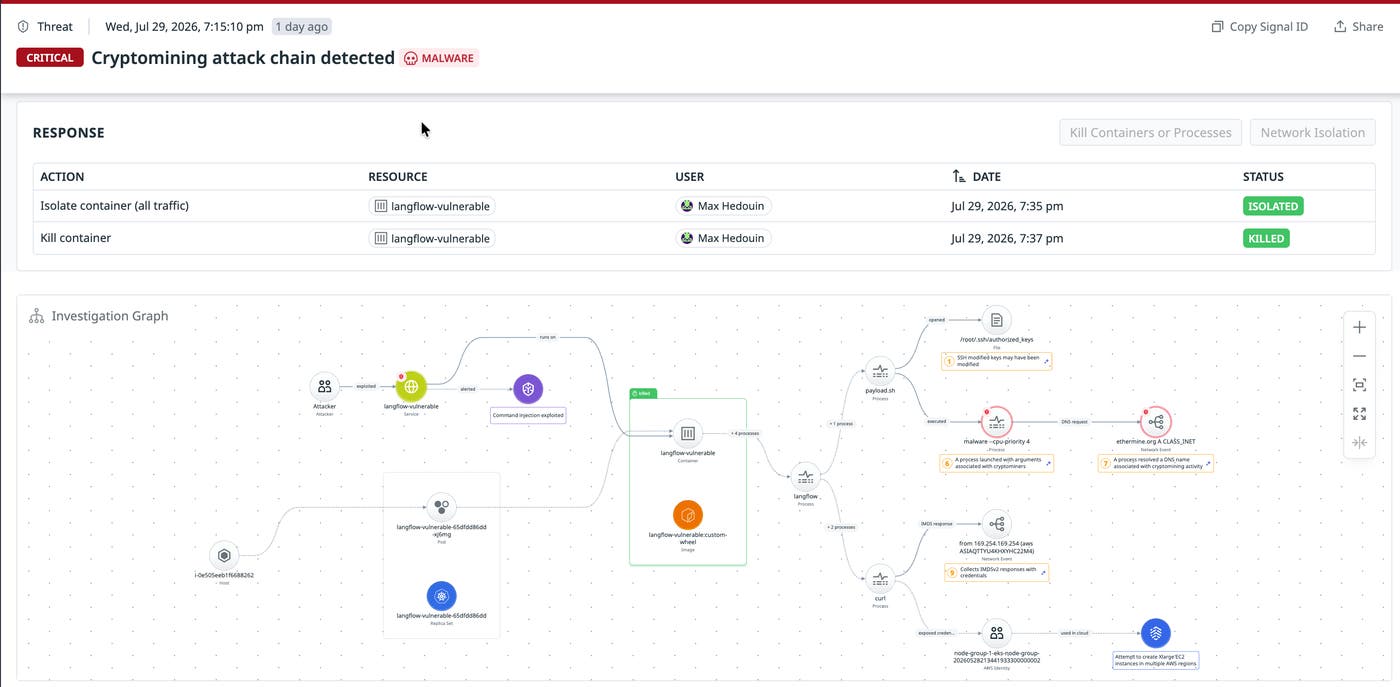
When the Agent identifies suspicious activity at runtime, it raises a Workload Protection signal. From there, you can decide whether to kill the process or container, isolate the workload, or both. For example, the signal below shows the response actions a user took against an affected container, and the investigation graph maps how the attack unfolded.
Contain threats with precision and control
Acting on the wrong resource can take down healthy services, and without proper authorization controls, the feature itself could be turned against you. Workload Protection helps ensure every action, whether automatic or manual, is authorized by the right person and targets the right resource. It works at the kernel level, creating a real-time view of every process and container. That view lets it confirm who is allowed to act, what the action targets, and how it acts on that resource without disrupting anything healthy.
Authorizing the actor
First, an action has to prove it’s allowed to run. Killing a process or isolating a workload requires elevated permissions granted specifically for response actions. Without these permissions, you can’t configure an Agent rule for automated response or trigger a manual response. Every action is also recorded and timestamped, giving you a history you can audit later.
Identifying the resource
Next, the action has to reach the right resource without touching a healthy one. The Agent continuously maintains a process tree, tracking each one by namespace-independent process ID (PID) along with its parent and ancestor processes. To respond on a container, the Agent uses control group (cgroup) tracking and the one-to-one mapping between a container ID and its cgroup to associate each process with the container it belongs to. This gives the Agent a precise, real-time map of your execution environment. Once the right process or container is identified, the Agent acts on it directly.
Executing the response
Finally, the Agent can respond safely. It can kill the offending process or container to stop the threat at its source, isolate a compromised workload without disrupting the healthy traffic around it, or do both. To terminate a process, the Agent issues a kill both from user space and inside the kernel, targeting the process’s PID or cgroup.
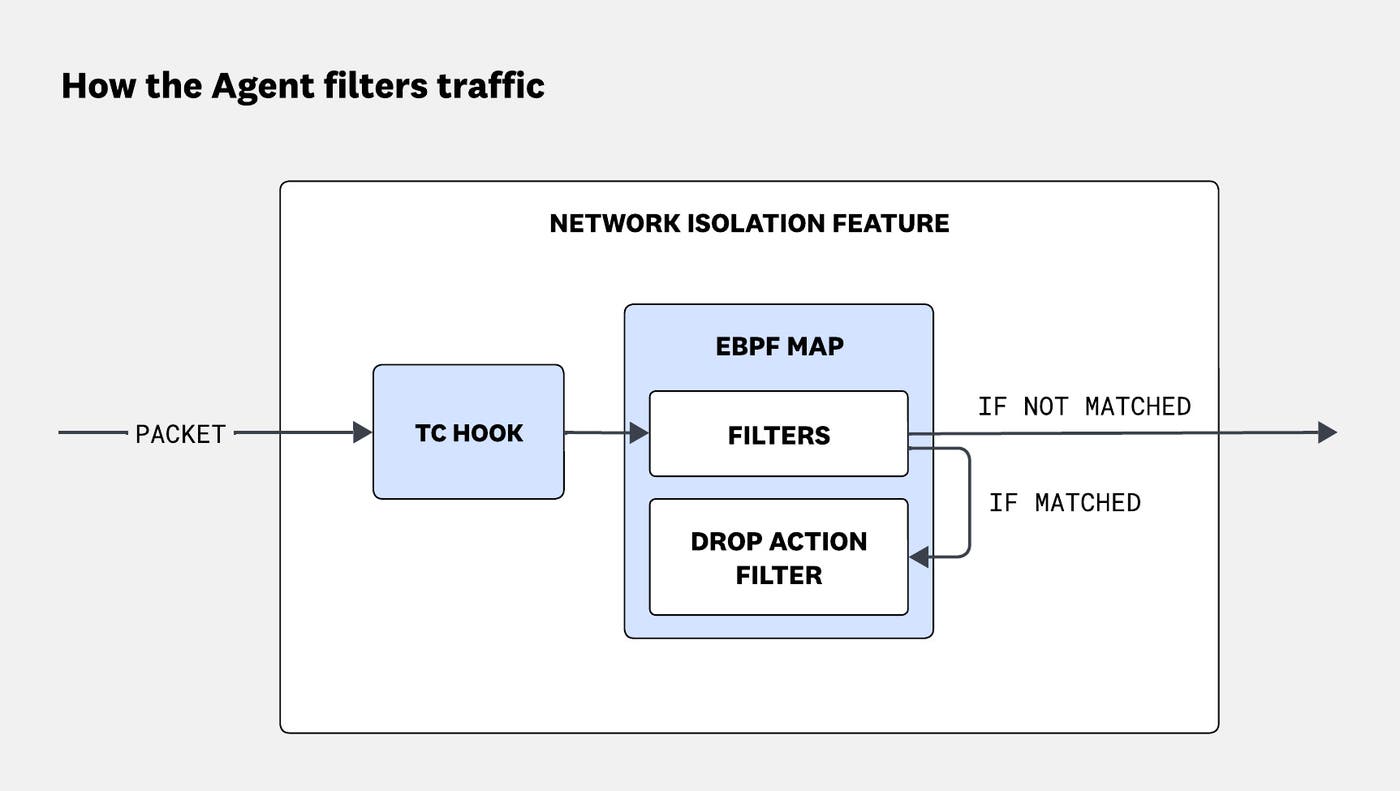
To isolate traffic precisely, the Agent uses eBPF-based filters injected directly into the kernel, inspecting traffic on both ingress and egress. For each packet, a traffic control (TC) hook identifies the process and cgroup by first checking kernel structures and then falling back to the Agent’s record of network flows. The packet is then evaluated against the filters stored in an eBPF map:
If the packet matches the isolation rule, it’s dropped.
If it doesn’t match, it passes through untouched.
The filters operate at the kernel level and target PIDs and cgroups. Berkeley packet filters can also match on specific traffic, ports, and protocols, giving you full control over what you isolate. Isolation works at the finest granularity, distinguishing a single process or container from everything else sharing the same IP or port. Together, these controls help ensure that each action targets only the resources associated with the signal, and runs only when triggered by an authorized user or automatically by an Agent rule configured for automated response.
Get started with Workload Protection response actions
Workload Protection now lets you stop threats at runtime, automatically through Agent rules or manually from a raised signal. Every action is tracked, timestamped, and documented, so you can audit exactly what happened and when. This creates a tighter loop between detection and response without requiring a handoff or switching tools. Workload Protection no longer just detects threats. It acts on them.
To enable automated or manual response actions on your own workloads, review the response requirements.
If you’re not already a Datadog customer, sign up for a free 14-day trial.
