Editor’s note: UWSGI uses the term “master” to describe its primary process. Datadog does not use this term, but in this blog post we will include it for the sake of clarity in instances where we must reference a specific process name.
Flask is a Python framework known for its ease of use. It inherits Python’s advantages of extensibility, broad support, and relative simplicity.
It’s known as a microframework because it relies on extensions for much of its functionality. Flask avoids constraining the developer to a predetermined database or authentication mechanism, for example, and instead leaves room for choice. Numerous Flask extensions are available, so you can create a custom architecture to suit your preferences and use case.
In this article, we will show you how to monitor a Flask application, from the underlying infrastructure to the performance of the app itself, using Datadog. As you follow along with the article, you will:
- Install the Datadog Agent and the Python tracing client library
- Integrate Flask with Datadog to collect request traces and other data from your application
- Configure Datadog to collect metrics and logs from your app infrastructure, including uWSGI and MySQL
(Although we focus on uWSGI and MySQL in this article, Datadog also integrates with other common components, such as Gunicorn and Postgres.) We’ll conclude with a discussion of some of the potential advantages of adding NGINX to the stack.
Your Flask app
Because Flask is an non-opinionated framework, you have the option of assembling your stack in several different ways. In addition to your Python code, your Flask app will likely incorporate a database, and you’ll need to interface your app with an HTTP(S) server to make it available to web clients.
Database
Flask does not include database support on its own; you’ll need to add an extension to your project to support your preferred database. Flask’s extensions registry includes extensions that support relational and non-relational databases. The Flask-SQLAlchemy extension adds database support for several relational databases, including PostgreSQL and MySQL. It abstracts your database operations, making it easier to use one database during development (e.g., SQLite) and later switch to a production-ready database like PostgreSQL.
WSGI server
The Web Server Gateway Interface (WSGI) is a standard that defines how a Python app and a web server communicate. Flask is WSGI-compliant, and can communicate with any HTTP server that’s also WSGI-compliant. Some web servers (such as NGINX) support WSGI natively; others do not (such as Apache), but can be made to support WSGI by adding a module (such as mod_wsgi).
Whether it’s built in to the web server or implemented as separate infrastructure, WSGI support is required in your Flask stack. If your web server isn’t WSGI-compliant, you can use an application such as uWSGI or Gunicorn to provide WSGI support.
During development, you can simplify your infrastructure by using Flask’s built-in WSGI/HTTP server. The built-in server is not designed to support a production application, however, so you’ll need to move to a production-ready server such as Apache or NGINX to launch your app.
Correlate metrics, logs, and traces to gain visibility into your Flask apps with Datadog.
Installing the Datadog Agent
On the server where your Flask app is running, you’ll need to install the Datadog Agent so you can start monitoring your application.
The Agent is the lightweight, open source program that sends information from your host to your Datadog account. You can retrieve the Agent installation command for your OS, preconfigured with your API key, here. (You’ll need to be logged in to your Datadog account to access the customized installation command. If you don’t have an account, you can sign up for a free 14-day trial to get started.)
Next, install ddtrace, Datadog’s Python tracing client library. The Agent uses this library to trace requests to your application and collect detailed performance data about your application:
pip install ddtrace
Now that the components of your Flask app are in place and the Datadog Agent and Python tracing library are installed, you’re set to begin collecting data from your Flask application and infrastructure. In the next section, you’ll configure the Agent to start sending traces and logs to your Datadog account.
Capturing traces and logs from your Flask app
Tracing your code
Datadog’s APM gives you end-to-end visibility into the performance of your application. Datadog automatically instruments your Flask application and displays trace information on flame graphs in your Datadog account. You can visualize the execution of a request to see timing, latency, and errors, and you can correlate trace data with logs and metrics from your application.
The screenshot above illustrates one request trace from a Flask app. As the trace shows, this particular request was executed in 1.92 milliseconds, returning a 200 OK response. You can see that the application spent 11.5 percent of the time executing a SQLite query.
Taken as a whole, then, this flame graph represents how much time the app’s show_entries method spent executing, including the sequence and duration of calls to other functions (which could be calls to databases or caching servers, even on different hosts).
APM also recognizes HTTP response codes, so you can see 5xx errors and other valuable performance data at a glance. For each request, you can see response codes, error messages, and even stack traces without switching to other data sources or troubleshooting tools.
To learn more, see the Datadog documentation on APM and tracing.
Automated instrumentation
The Datadog Python tracing client library, ddtrace, automatically instruments your Flask app, so you can start collecting traces without making any changes to your code. You will, however, need to restart your app using the ddtrace-run wrapper.
Here’s a sample command of how to do that for a Flask app named sample_app.py on port 4999:
FLASK_APP=sample_app.py DATADOG_ENV=flask_test ddtrace-run flask run --port=4999
(By default, Flask runs apps on port 5000. The Datadog Agent also uses 5000 by default, so this command specifies a different Flask port to avoid any conflict.)
The above command defines DATADOG_ENV as an environment variable and assigns a value of flask_test. On the services page in your Datadog account, you’ll see a drop-down in the top left, which allows you to filter your results to a specific environment. You can then click on any service name to view performance data for that service, including request rate, error rate, and latency.
Custom instrumentation
For an even closer view of the execution of your app, you can add custom traces and metadata. The simplest way to add a custom trace is to use the wrap decorator, which allows you to trace an entire function by adding just one line of code. (Decorators—functions that modify other functions—are useful throughout Flask and Python more generally, not just in APM.)
This sample code shows the wrap decorator added before each of the methods (function1, function2, and function3) called by the resource (my_flask_resource). Using the wrap decorator, you can also add metadata to your traces, such as the custom name (my_span) and tag (service_type:my_service_type) shown below.
With flame graphs like the one shown above, you can visualize the performance of your app’s services and spot problems like higher-than-expected latency. Below, we’ll show how you can also collect Python logs to increase the information available to you for troubleshooting.
Collecting Python logs
The Flask framework relies on Python for logging, which requires that you add logging calls to your code. Once you have your app logging to a file, you can configure the Agent to forward logs to your Datadog account. In this section, we’ll configure the Agent to collect logs from your Flask app, then add a logging statement to the sample code and look at the resulting log entry.
Configure the Agent for logging
Datadog’s Log Management features require the latest version of the Agent, version 6. If you need to upgrade, follow the instructions here before continuing.
To enable logging, first edit the Agent’s configuration file. You can find the path to the file in your OS here. Uncomment and update the logs_enabled line to read
logs_enabled: true
Configure the Python integration
Next, create a configuration file for the Python integration under the Agent’s conf.d directory:
mkdir conf.d/python.d # Create a Python config directory under conf.d
vi conf.d/python.d/conf.yaml # Create and open the config file`
Add the following lines to conf.yaml:
init_config:

instances:

logs:

  - type: file
    path: /var/log/my-log.json
    service: flask
    source: python
    sourcecategory: sourcecode
Of note in the configuration snippet above are three tags we should examine further: service, source, and sourcecategory.
The
servicetag identifies a relationship between separate components of your application. In the section above on tracing code in your Flask app, you collected traces from a service namedflask. (This is the default service name; for instructions on overriding the default value, see the ddtrace documentation.) Because you’re also usingflaskas the service name here in the log configuration, you can easily associate logs and traces from this app within your Datadog account.The value of the
sourcetag determines the pipeline to which the log is routed. The log is processed by the pipeline and made available to you in the Log Explorer.The
sourcecategorytag is available to you to use as a custom tag. You can apply any value that’s useful to you in grouping your logs for analysis in the Log Explorer.
Next, set the proper ownership on the new python.d directory:
chown -R dd-agent:dd-agent conf.d/python.d/
Then restart the Agent to load your revised configuration.
Update the Python code
To start instrumenting your application code for logging, you’ll need to import a Python logging library. The Datadog Python log documentation gives a detailed example of how to use a library to send Python logs to your Datadog account. In this section, we’ll step through a simple example to demonstrate.
First, import a Python logging library. Here, we’ll use JSON Log Formatter:
pip install json_log_formatter
Next, add log statements to your code where something might happen that you want to record. Returning to the example code referenced earlier, you can extend function1 to include a statement that adds a message and a job_category tag to your Python logs:
# First, import the logging library:
import logging
import json_log_formatter
import threading

formatter = json_log_formatter.JSONFormatter()
json_handler = logging.FileHandler(filename='/var/log/my-log.json')
json_handler.setFormatter(formatter)
logger = logging.getLogger('my_json')
logger.addHandler(json_handler)
logger.setLevel(logging.INFO)

# Then add a logging statement to one of the existing functions:
@tracer.wrap(name='my_resource1')
def function1():
    my_thread= threading.currentThread().getName()
    time.sleep(0.01)
    logger.info('function1 has executed',
        extra={
            'job_category': 'test_function',
            'logger.name': 'my_json',
            'logger.thread_name' : my_thread
        }
    )
    return True
Now, each time that function executes, you’ll see a new line like this in your Python log file:
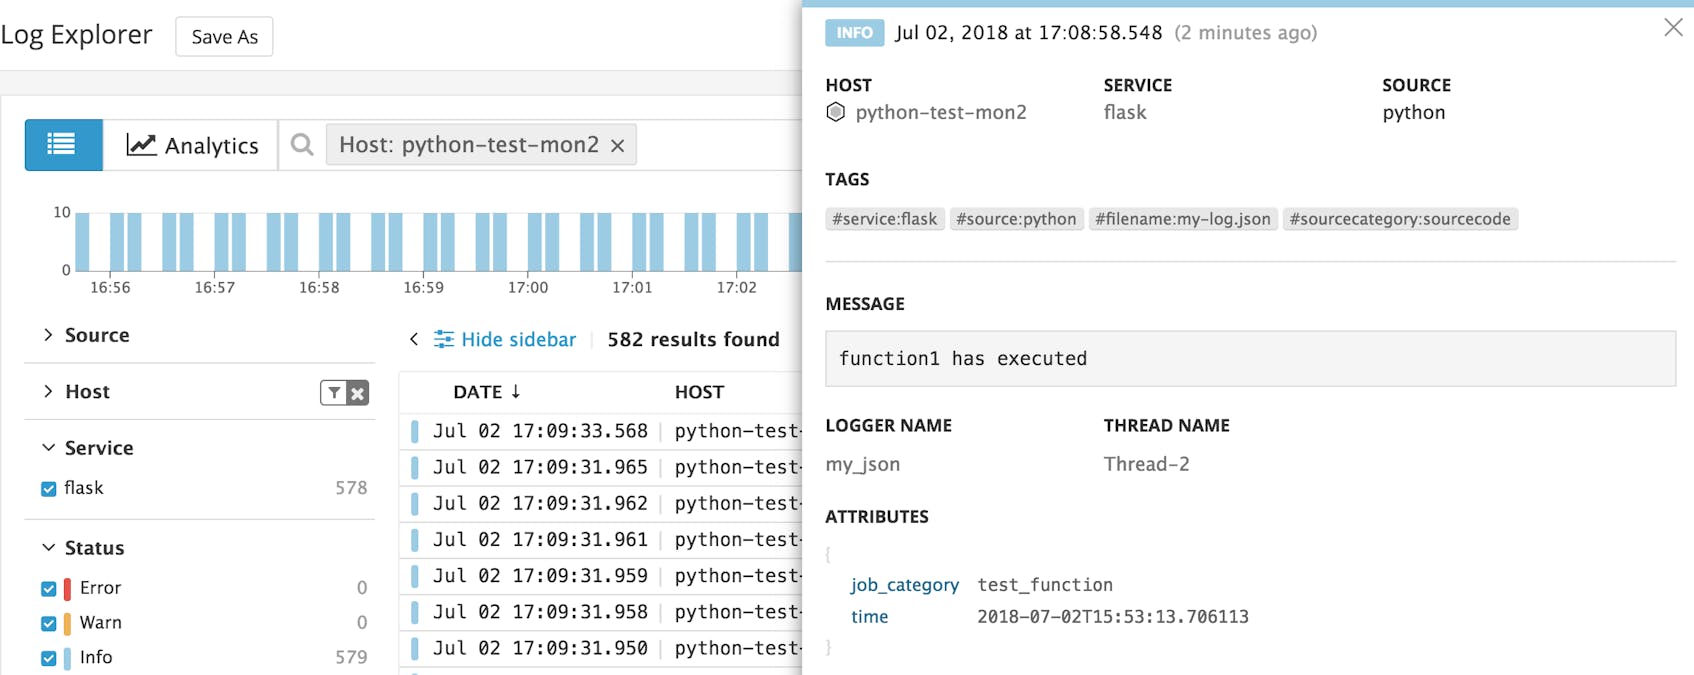
{"time": "2018-07-02T15:53:13.706113", "job_category": "test_function", "message": "function1 has executed", "logger.name": "my_json", "logger.thread_name": "Thread-2"}
The screenshot below shows how logs from your Flask app will look in the Log Explorer.
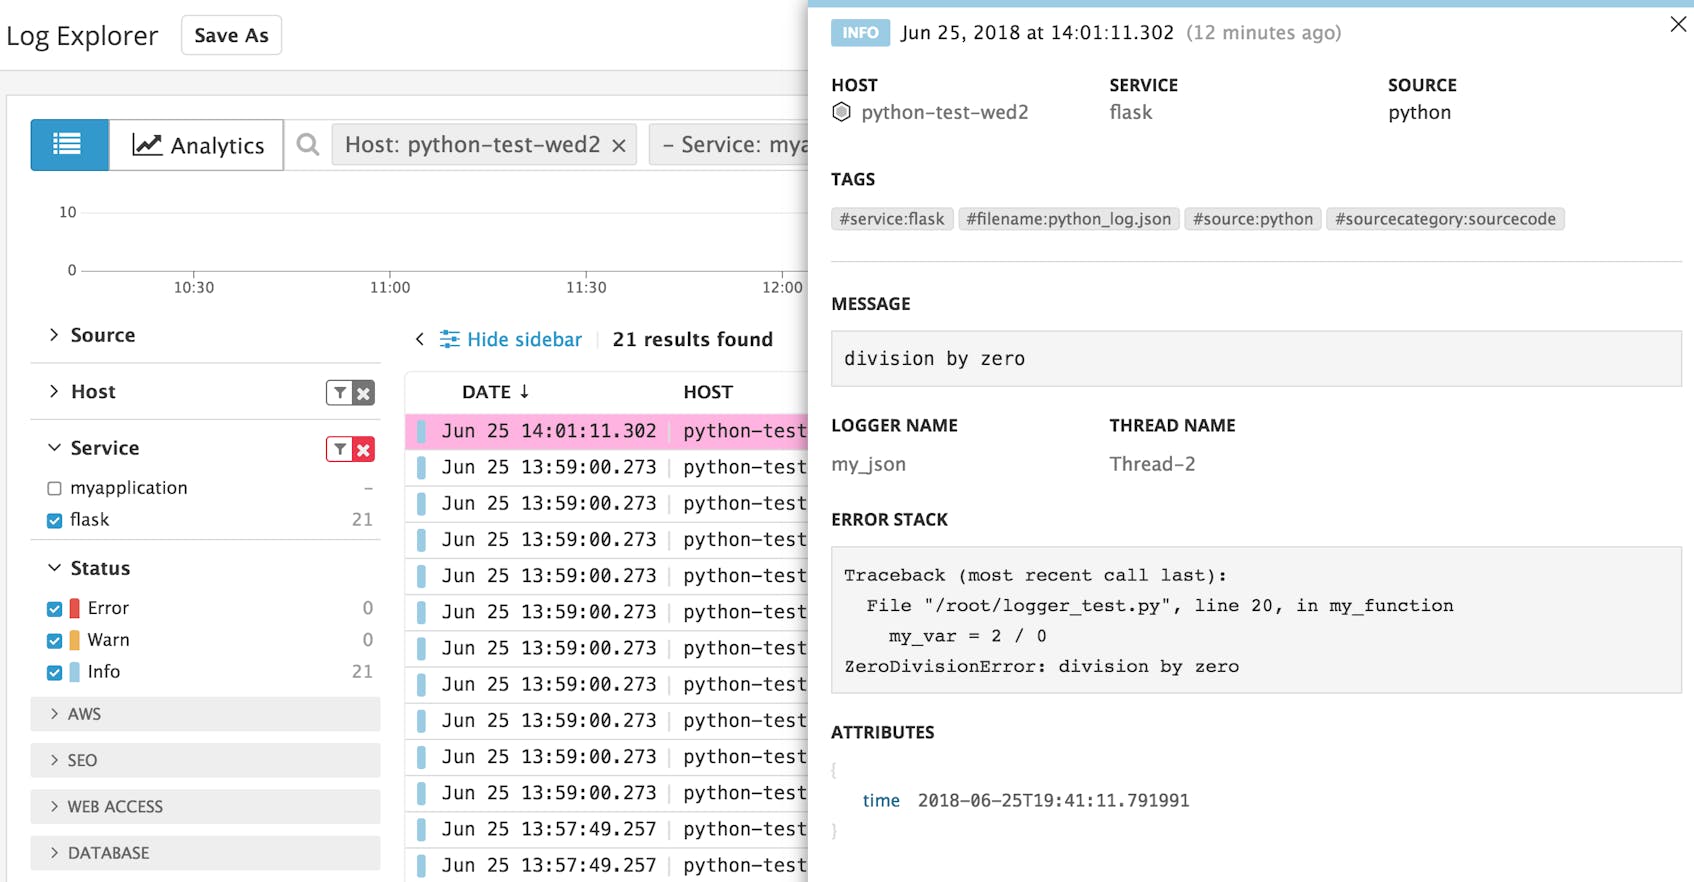
The built-in pipeline for Python logs automatically extracts certain fields. The screenshot below shows a different function, which returns a stack trace message. The message, logger name, thread name, and error stack attributes are parsed and displayed in the Log Explorer.
Now that you’re collecting logs and traces from your Flask app, you can monitor, troubleshoot, and even prevent issues that could affect your users’ experience. Next, we’ll walk through how to begin collecting infrastructure metrics to give you even greater visibility.
Collecting metrics from uWSGI
Note: This section includes a process name that uses the term “master.” Datadog does not use this term, but we will include it here for the sake of accuracy.
The WSGI server is the interface between your Flask app and your web server. In our example, uWSGI serves as both WSGI server and HTTP server. (There can be performance and monitoring advantages to running a separate HTTP server in your Flask stack, and we’ll discuss those below in the section on NGINX.) In this section, we’ll demonstrate how to collect metrics from uWSGI.
To make the Agent aware of uWSGI so it can collect metrics and forward them to your Datadog account, you need to install the uwsgi-dogstatsd plugin. Execute the following command on your uWSGI host:
uwsgi --build-plugin https://github.com/Datadog/uwsgi-dogstatsd
Next, create an ini file, my_uwsgi.ini, in the same directory as your Flask app. Add these lines:
[uwsgi]
master = true
processes = 8
threads = 4

# DogStatsD plugin configuration
enable-metrics = true
plugin = dogstatsd
stats-push = dogstatsd:127.0.0.1:8125,flask
The stats-push line in this file lists the IP address and port of the dogstatsd process, and specifies the prefix to be applied to this app’s metric names, flask. For information about the other configuration options in this file, see the Python/WSGI documentation.
Finally, start your uWSGI server to make your app available to clients. This command assumes an application object named application in a Flask app named my_app:
uwsgi --ini=my_uwsgi.ini --socket 0.0.0.0:9090 --protocol=http -w my_app:application
In a separate terminal window, use this command to generate some traffic to the app:
for i in {1..10}; do curl http://127.0.0.1:9090; done
Visit the Metrics Explorer in Datadog to view metrics generated by the new app. The screenshot below shows an example.
*.worker.requests is one of many metrics collected automatically by the uwsgi-dogstatsd plugin. You can view other metrics by typing the metric name in the Graph field in the Metrics Explorer. For a full list of available uWSGI metrics, see the plugin documentation.
Capturing MySQL metrics and logs
Configuring the Agent to collect MySQL metrics
By configuring the Datadog Agent to collect real-time data from MySQL, you can monitor database reads, writes, connections, queries, and cache activity. (For detailed information, see our series about MySQL monitoring.) In this section, we’ll walk through setting up the Datadog integration with MySQL.
Create the MySQL user
First, create a MySQL user for the Datadog Agent:
CREATE USER 'datadog'@'localhost' IDENTIFIED BY '<MY_PASSWORD>';
Grant the datadog user the necessary privileges:
GRANT REPLICATION CLIENT ON *.* TO 'datadog'@'localhost' WITH MAX_USER_CONNECTIONS 5;
GRANT PROCESS ON *.* TO 'datadog'@'localhost';
FLUSH PRIVILEGES;
MySQL versions 5.5.3 and later have a MySQL Performance Schema feature that you can enable to collect additional metrics. Below, we’ll enable the Agent to take advantage of this feature. If you’ve enabled the Performance Schema on your MySQL server, execute the following statement to provide the Agent access to those metrics:
GRANT SELECT ON performance_schema.* TO 'datadog'@'localhost';
FLUSH PRIVILEGES;
Configure metric collection from MySQL
Next, create a configuration file for the Agent to enable the MySQL integration. The directory that holds integration configuration files is listed here. From that directory, create a MySQL configuration file based on the template:
cd conf.d/mysql.d
cp conf.yaml.example conf.yaml
Edit conf.yaml to uncomment and modify these lines:
init_config:

instances:
  - server: 127.0.0.1
    user: datadog
    pass: '<MY_PASSWORD>' # from the CREATE USER step above
    options:
      replication: false
      galera_cluster: true
      extra_status_metrics: true
      extra_innodb_metrics: true
      extra_performance_metrics: true
      schema_size_metrics: false
      disable_innodb_metrics: false
Restart the Agent to load your new configuration file. See the Agent documentation for the appropriate restart command for your OS.
View your metrics
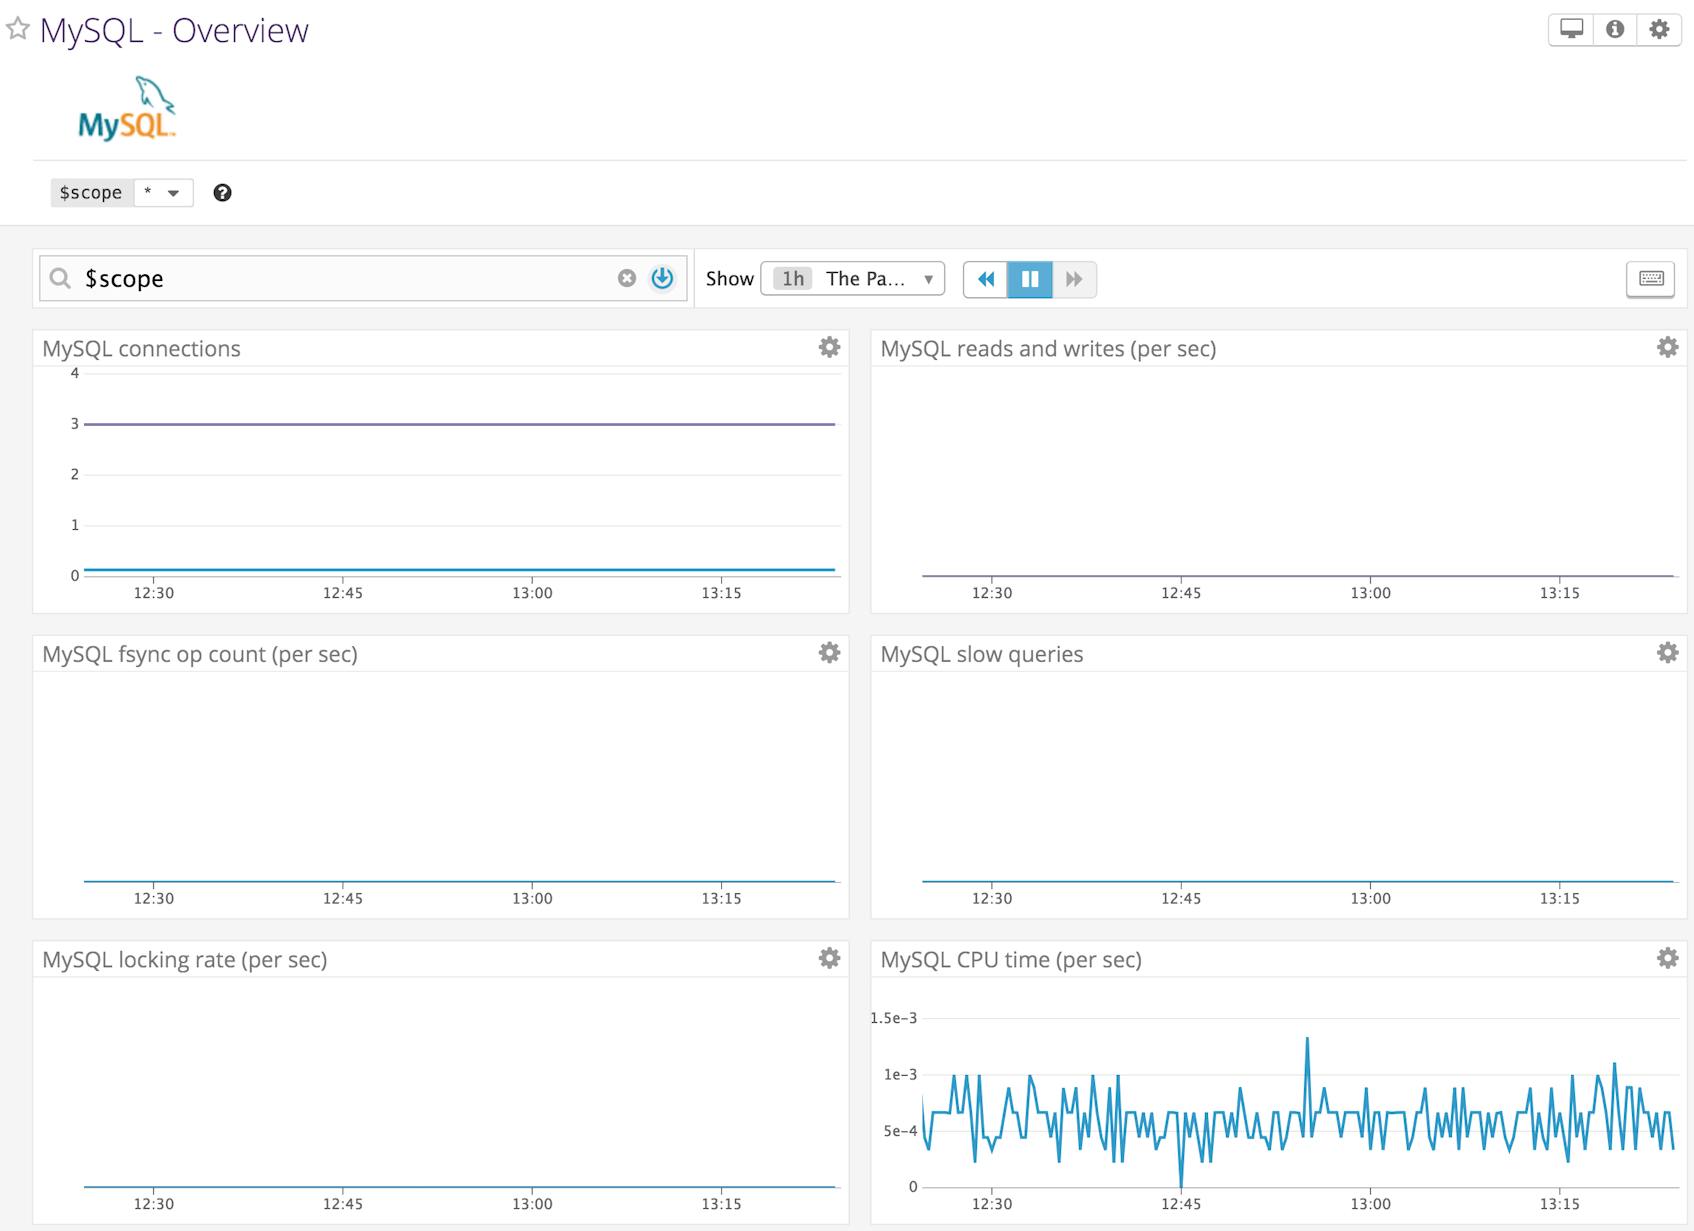
A template MySQL dashboard in your Datadog account will now begin showing real-time information about your MySQL server. The screenshot below shows an example.
Configuring log collection from MySQL
By collecting MySQL logs, you can view within your Datadog account the SQL statements and error messages generated by your database. In this section, we’ll show how to collect MySQL logs, including slow query logs and error logs.
Edit the Agent configuration
Earlier you configured the Agent to collect Python logs. The change you made in the Agent configuration file—setting logs_enabled to true—will also enable the Agent to collect MySQL logs.
To update the Agent’s MySQL integration to configure it for log collection, open the mysql.d/conf.yaml file you edited above and add the following lines:
logs:
  - type: file
    path: /var/log/mysql/error.log
    source: mysql
    sourcecategory: database
    service: flask
    log_processing_rules: #Convert MySQL's multiline logs to one line
      - type: multi_line
        name: new_log_start_with_date
        pattern: \d{4}\-(0?[1-9]|1[012])\-(0?[1-9]|[12][0-9]|3[01])

  - type: file
    path: /var/log/mysql/mysql-slow.log
    source: mysql
    sourcecategory: database
    service: flask

  - type: file
    path: /var/log/mysql/mysql.log
    source: mysql
    sourcecategory: database
    service: flask
    log_processing_rules: #Convert MySQL's multiline logs to one line
      - type: multi_line
        name: new_log_start_with_date
        pattern: \d{4}\-(0?[1-9]|1[012])\-(0?[1-9]|[12][0-9]|3[01])
This configuration specifies locations and metadata for three different types of MySQL logs:
- The error log is where the server writes information about errors it encounters
- The slow query log shows SQL statements that took longer to execute than the configured
long_query_time(2 seconds by default) - The general query log (mysql.log) records client connections and SQL statements
Each log has a source value of mysql, which routes the logs through Datadog’s MySQL pipeline and makes the processed logs available in the Log Explorer interface, where you can use the source, sourcecategory, and service attributes as facets to analyze your logs. (See Datadog’s documentation on log management for more information about pipelines and facets.) Because the value of the service tag assigned here matches that in the Python configuration (python.d/conf.yaml) outlined above, you can see both the Python and MySQL logs from your app in the Log Explorer when you filter by service.
Update MySQL config files
Next, update MySQL’s configuration to write to the log files you designated in the Agent configuration above. The paths and filenames in this section assume a Ubuntu server running MySQL 5.7; file locations may differ on other distributions and versions, so consult the MySQL documentation for specifics.
First, rename mysqld_safe_syslog.cnf. This MySQL config file contains some default information that we’ll override below.
mv /etc/mysql/mysql.conf.d/mysqld_safe_syslog.cnf /etc/mysql/mysql.conf.d/mysqld_safe_syslog.cnf
.old
Next, edit (or create) the MySQL configuration file /etc/mysql/my.cnf. Add these lines to specify where MySQL will log general info, errors, and slow queries (longer than 2 seconds):
[mysqld]
general_log = on
general_log_file = /var/log/mysql/mysql.log
log_error=/var/log/mysql/error.log
slow_query_log = on
slow_query_log_file = /var/log/mysql/mysql-slow.log
long_query_time = 2
Next, add the user dd-agent to the adm group.
usermod -a -G adm dd-agent
Then make sure that group can read the MySQL logs:
chown mysql:adm /var/log/mysql/*
Restart your MySQL server to apply these configuration changes. The restart command differs depending on your server’s OS and version. If your system uses systemd as its init system, use
sudo systemctl restart mysql
If upstart is your init system, use
sudo service mysql restart
Finally, restart the Datadog Agent. See the Agent documentation for the appropriate restart command for your OS.
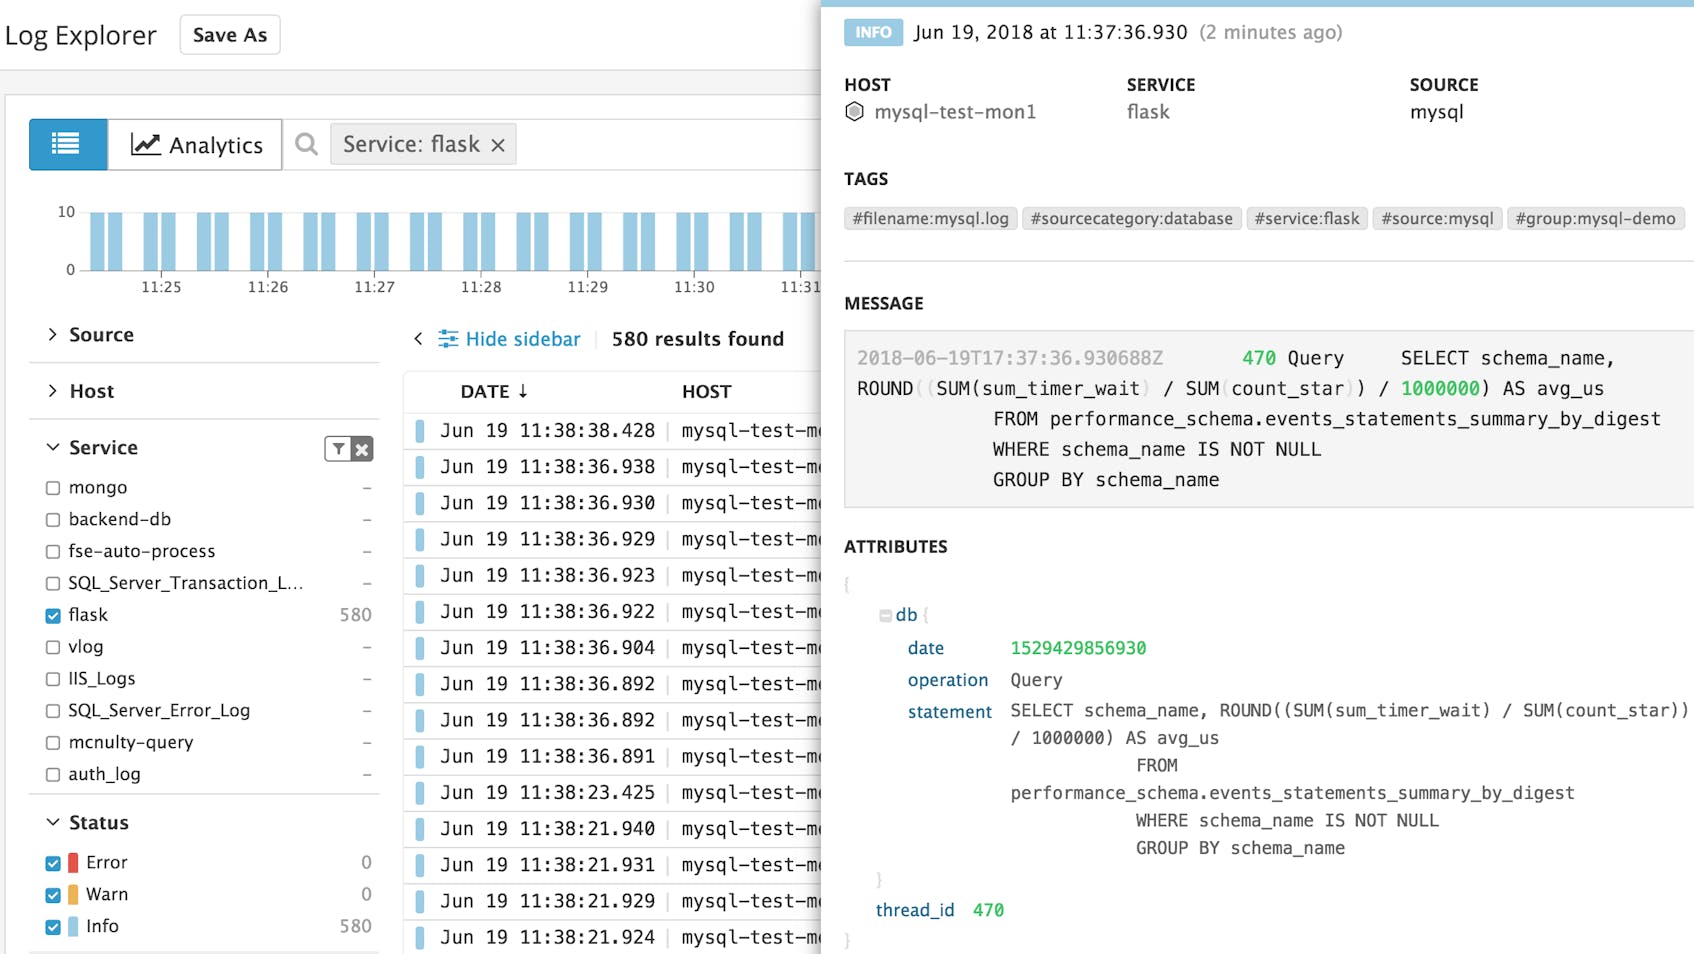
You should now see MySQL logs appearing in the Log Explorer page in your Datadog account.
You’ve now made your app more observable by instrumenting it to report metrics, logs, and request traces. Using the tools in your Datadog account, you can easily troubleshoot problems and monitor application performance to ensure the quality of your users’ experience.
Adding NGINX as a dedicated HTTP server
Your app may perform better if your WSGI and HTTP servers are running on separate infrastructure. It’s common for a Flask app to feature NGINX in front of uWSGI, as NGINX is extremely efficient for serving static content. In this configuration, Flask and uWSGI create and serve the dynamic content, and NGINX handles web traffic, proxying requests to uWSGI as necessary and serving static content itself.
If you’re running NGINX as a web server for your Flask app, you can gather metrics and logs from NGINX to provide additional context for app performance and utilization. See our post on monitoring NGINX with Datadog for details on how to collect real-time data from your web servers.
Integrate with Datadog to monitor your Flask stack
Using the Flask framework, you have the flexibility to assemble a custom stack, and the extensibility to modify your infrastructure as your app scales. In this post, we’ve used uWSGI and MySQL as an example stack, and shown how you can combine metrics, logs, and traces to gain visibility into your Flask app. Whichever components you choose for your app infrastructure, Datadog provides visibility into traffic, resource utilization, and performance, as well as low-level details for troubleshooting and performance optimization, all in one place. Get started today with a free 14-day trial.


